Summary
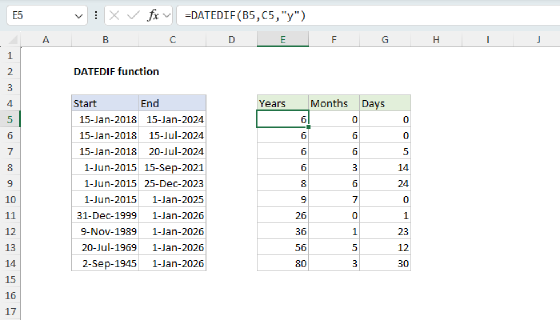
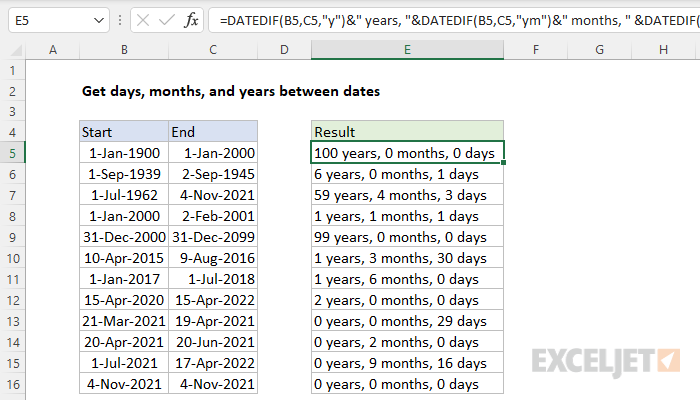
To calculate and display the time between two dates in days, months, and years, you can use a formula based on the DATEDIF function. In the example shown, the formula in E5 is:
=DATEDIF(B5,C5,"y")&" years, "&DATEDIF(B5,C5,"ym")&" months, " &DATEDIF(B5,C5,"md")&" days"
where start dates are in column B, and end dates are in column C.
Note: See below for a few options that use the LET function to simplify and extend the formula.
Generic formula
=DATEDIF(start,end,"y") &" years,"&DATEDIF(start,end,"ym") &" months," &DATEDIF(start,end,"md") &" days"
Explanation
In this example, the goal is to output the time between a start date and an end date as a text string that lists years, months, and days separately. For example, given a start date of 1-Jan-2018 and an end date of 1-Jul-2018, the result should be a string like this:
"1 years, 6 months, 0 days"
DATEDIF solution
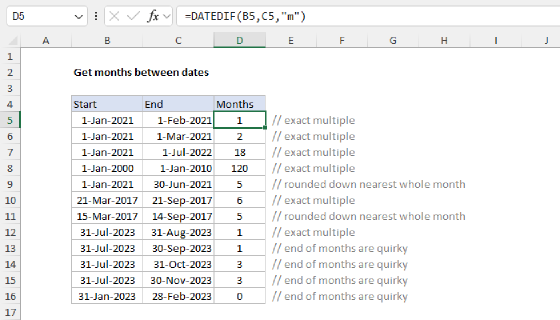
The DATEDIF function is designed to calculate the difference between dates in years, months, and days. There are several variations available (e.g. time in months, time in months ignoring days and years, etc.) and these are set by the "unit" argument in the function. See this page on the DATEDIF function for a full list of available units.
In the example shown, we calculate years, months, and days separately, then "glue" the results together with concatenation. To get whole years, whole months, and days between the dates, we use DATEDIF like this, altering only the unit argument.
DATEDIF(B5,C5,"y") // years
DATEDIF(B5,C5,"ym") // months
DATEDIF(B5,C5,"md") // days
Because we want to create a string that appends the units to each number, we concatenate the number returned by DATEDIF to the unit name with the ampersand (&) operator like this:
DATEDIF(B5,C5,"y")&" years" // years string
DATEDIF(B5,C5,"ym")&" months" // months string
DATEDIF(B5,C5,"md")&" days" // days string
Finally, we need to extend the idea above to include spaces and commas and join everything together in one string:
=DATEDIF(B5,C5,"y")&" years, "&DATEDIF(B5,C5,"ym")&" months, " &DATEDIF(B5,C5,"md")&" days"
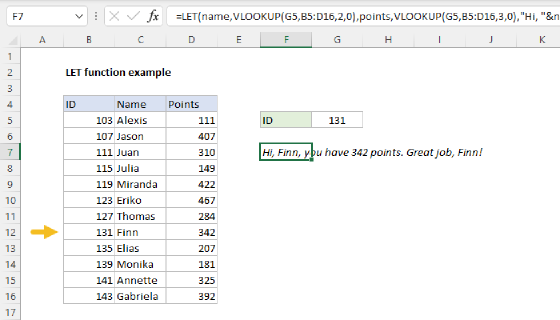
Implementing the LET function
The LET function (new in Excel 365) can simplify some formulas by making it possible to define and reuse variables. In order to use the LET function on this formula, we need to think about variables. The main purpose of variables is to define a useful name that can be reused elsewhere in the formula code. Looking at the formula, there are at least five opportunities to declare variables. The first two are the start date and the end date, which are reused throughout the formula. Once we assign values to start and end, we only need to refer to cells C5 and D5 one time. As a first step, we can add line breaks and then define variables for start and end like this:
=LET(
  start,B5,
  end,C5,
  DATEDIF(start,end,"y")&" years, "&
  DATEDIF(start,end,"ym")&" months, "&
  DATEDIF(start,end,"md")&" days"
)
Notice all instances of B5 and C5 in DATEDIF have been replaced by start and end. The result from this formula is the same as the original formula above, but the reference to B5 and C5 occurs only once. The start and end dates are then reused throughout the formula. This makes it easier to read the formula and helps reduce errors.
The next three opportunities for variables are the results from DATEDIF for years, months, and days. If we assign these values to named variables, we can more easily combine them later in different ways, which becomes more useful in the extended version of the formula explained below. Here is the formula updated to include new variables for years, months, and days:
=LET(
  start,B5,
  end,C5,
  years,DATEDIF(start,end,"y"),
  months,DATEDIF(start,end,"ym"),
  days,DATEDIF(start,end,"md"),
  years&" years,"&months &" months," &days &" days"
)
Notice we have assigned results from DATEDIF to the variables years, months, and days, and these values are concatenated together in the last line inside the LET function. With the LET function, the last argument is the calculation or value that returns a final result.
Getting fancy with LET
Once we have the basic LET version working, we can easily extend the formula to do more complex processing, without redundantly running the same calculations over again. For example, one thing we might want to do is make the units plural or singular depending on the actual unit number. The formula below adds three new variables: ys, ms, and ds to hold the strings associated with each unit:
=LET(
  start,B5,
  end,C5,
  years,DATEDIF(start,end,"y"),
  months,DATEDIF(start,end,"ym"),
  days,DATEDIF(start,end,"md"),
  ys,years&" year"&IF(years<>1,"s",""),
  ms,months&" month"&IF(months<>1,"s",""),
  ds,days&" day"&IF(days<>1,"s",""),
  ys&", "&ms&", "&ds
)
The strings start out singular (i.e. " year" not "years"). Then we use the IF function to conditionally tack on an "s" only when the number is not 1. If the number is 1, IF returns an empty string ("") and the unit name remains singular. Because we add the unit name to the unit number when we define ys, ms, and ds, the last step inside LET is simpler; we only need to concatenate the units with a comma and space.
See more details about the LET function here. Also, see the Detailed LET function example for another explanation of converting an existing formula to use LET.
The DATEDIF function can return incorrect results with date pairs that touch specific edge cases. One workaround is to build your own alternative with a custom lambda function. For details, see: How to replace Excel's DATEDIF function.