Summary
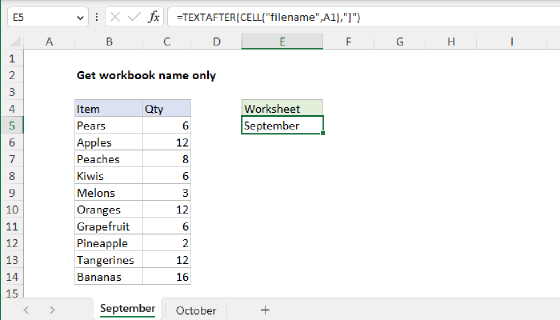
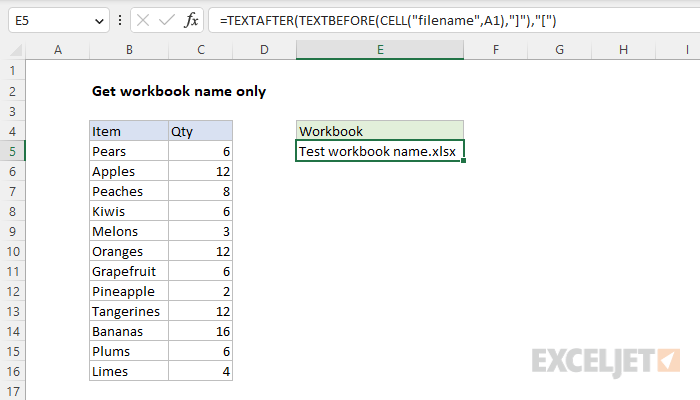
To get the workbook name only (i.e. the name of the Excel file) you can use a formula based on the CELL function with the TEXTAFTER and TEXTBEFORE functions. In the example shown, the formula in E5 is:
=TEXTAFTER(TEXTBEFORE(CELL("filename",A1),"]"),"[")
The result is the name of the workbook only, "Test workbook name.xlsx" in the example shown.
Note: TEXTAFTER and TEXTBEFORE are only available in the latest version of Excel. In Legacy Excel, you can use a more complicated formula based on the MID and FIND functions. Read below for details.
Generic formula
=TEXTAFTER(TEXTBEFORE(CELL("filename",A1),"]"),"[")
Explanation
In this example, the goal is to return the name of the current workbook with a formula. This is a fairly simple problem in the latest version of Excel, which provides the TEXTAFTER function and the TEXTBEFORE function. In older versions of Excel, you can use a more complicated formula based on the MID and FIND functions. Both options rely on the CELL function to get a full path to the current workbook. Read below for details.
Get workbook path
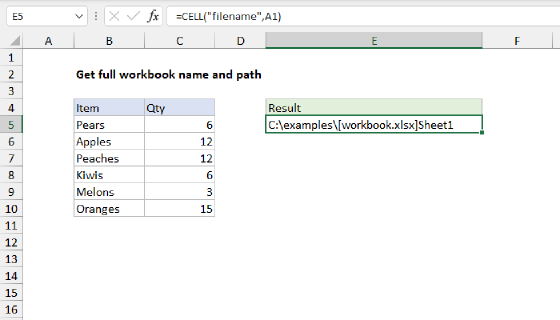
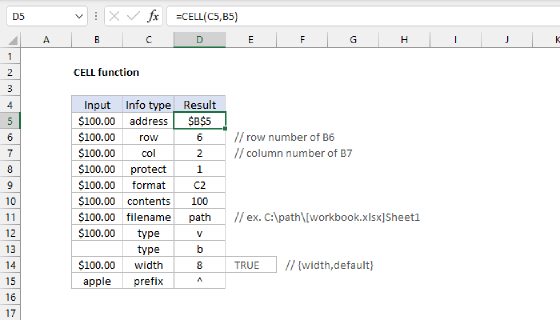
The first step in this problem is to get the workbook path, which includes the workbook and worksheet name. This can be done with the CELL function like this:
CELL("filename",A1)
With the info_type argument set to "filename", and reference set to cell A1 in the current worksheet, the result from CELL will be a full path as a text string like this:
"C:\path\to\folder\[workbook.xlsx]sheetname"
Notice the workbook name is enclosed in square brackets ("[name]"). The challenge then becomes how best to extract just the text between the square brackets from the path. The best way to do this depends on what Excel version you have. If you have the latest version of Excel, you should use TEXTAFTER and TEXTBEFORE functions. Otherwise, you can use the MID and FIND functions as explained below.
TEXTAFTER with TEXTBEFORE
In Excel 365, the easiest option is to use the TEXTAFTER function with the TEXTBEFORE function like this:
=TEXTAFTER(TEXTBEFORE(CELL("filename",A1),"]"),"[")
This is an example of nesting — the TEXTBEFORE function is nested inside of the TEXTAFTER function, and the CELL function is nested inside of TEXTBEFORE. Working from the inside out CELL returns the full path to the workbook as explained above, and the result is delivered to the TEXTBEFORE function, which extracts all text before the closing square bracket ("]"):
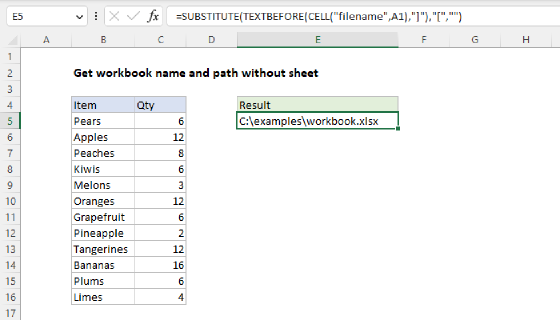
TEXTBEFORE(CELL("filename",A1),"]")
Delimiter is set to "]" in order to retrieve only text that occurs before the closing square bracket ("]"). The result looks like this:
"C:\path\to\folder\[workbook.xlsx"
This value is then delivered to the TEXTAFTER function, which is configured to return text after the opening square bracket ("["):
=TEXTAFTER("C:\path\to\folder\[workbook.xlsx","[")
The final result from TEXTAFTER is the workbook name only:
"workbook.xlsx"
Assuming a path like "C:\path\to\folder[workbook.xlsx]sheetname", the final result is "workbook.xlsx".
MID + FIND function
In older versions of Excel you can get the workbook name with a more complicated formula based on the MID and FIND function:
=MID(CELL("filename",A1),FIND("[",CELL("filename",A1))+1,FIND("]", CELL("filename",A1))-FIND("[",CELL("filename",A1))-1)
This formula is annoyingly complex, mostly because older versions of Excel do not have good text parsing functions, and this means the formula needs to work in small, redundant steps. Notice the CELL function is called 4 times!
To extract the workbook name, the formula works in 5 steps:
- Get the full path and filename.
- Locate the opening square bracket ("[").
- Locate the closing square bracket ("]").
- Calculate the length of the workbook name in characters.
- Extract the text between square brackets with the MID function.
Get path and filename
To get the path and file name, we use the CELL function like this:
CELL("filename",A1) // get path and filename
The info_type argument is "filename" and reference is A1. The cell reference is arbitrary and can be any cell in the worksheet. The result is a full path like this as text:
"C:\path\to\folder\[workbook.xlsx]sheetname"
The path starts with the drive and includes both the workbook name and the Sheet name. Notice the workbook name appears enclosed in square brackets.
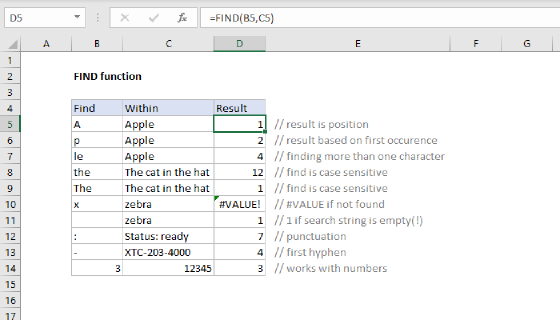
Locate the opening square bracket
The location of the opening square bracket ("[") is determined like this
FIND("[",CELL("filename",A1)) // returns 19
The FIND function returns the location of "[" (19) . We then add 1 because we want to extract text starting one character after the "[". We can now rewrite the formula like this:
=MID(CELL("filename",A1),20,FIND("]", CELL("filename",A1))-FIND("[",CELL("filename",A1))-1)
Locate the closing square bracket
Next, we locate the closing square bracket "]" in the same way with the FIND function:
FIND("]", CELL("filename",A1)) // returns 33
The FIND function returns 33, from which we subtract 1, in order to extract text up through character 32.
Calculate the length of the workbook name
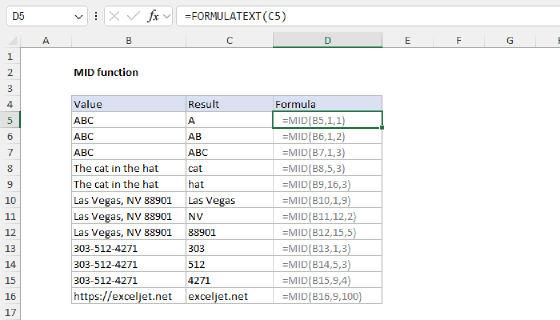
The final step is to extract the text between the square brackets, and this is done with the MID function. We know where we want to start (20) and where to end (32). However, while the MID function takes start_num as the starting position, there is no equivalent end_num. Instead, MID takes num_chars, the number of characters to extract. Therefore, we need to calculate num_chars by subtracting the opening bracket "[" location from closing bracket "]" location. All of the code below simply calculates the number of characters to extract:
=FIND("]", CELL("filename",A1))-FIND("[",CELL("filename",A1))-1
Using our test path above, the result is 13. This is the length of the workbook name in characters.
Extract the text between the brackets
We can now rewrite the formula like this:
=MID(CELL("filename",A1),20,13)
=MID("C:\path\to\folder\[workbook.xlsx]sheetname",20,13)
="workbook.xlsx"
The final result is "workbook.xlsx".