Summary
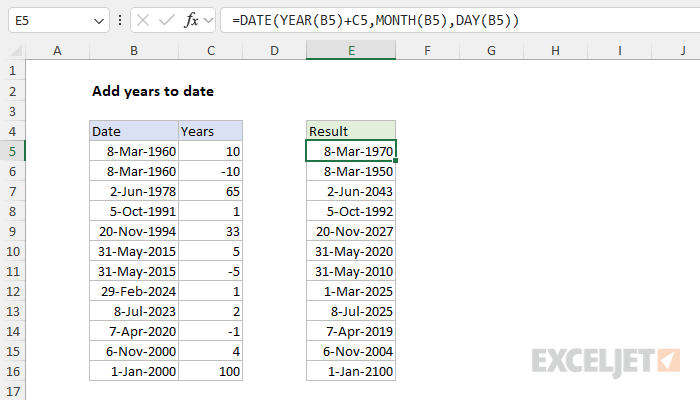
To add a given number of years to a date, you can use a formula based on the DATE function together with the YEAR, MONTH, and DAY functions. In the example shown, the formula in E5 is:
=DATE(YEAR(B5)+C5,MONTH(B5),DAY(B5))
With the date 8-Mar-1960 in cell B5, and the number 10 in C5, the result in E5 is 8-Mar-1970.
Note: This formula can return an incorrect result if the start date is the last day in February in a leap year. See below for a simpler and more robust formula that does not have this problem.
Generic formula
=DATE(YEAR(A1)+n,MONTH(A1),DAY(A1))
Explanation
Ever needed to calculate someone's retirement date? Or figure out when a 30-year mortgage will end? Or maybe you're setting a contract expiration date? In each case, you need a way to add years to a date.
Here's something that might surprise you: most Excel users tackle this problem with a formula that's 3x more complex than it needs to be. And worse, the solution can fail in leap years.
In this guide, I'll show you two ways to add years to dates: the traditional method that everyone learns first (and why it's not always ideal) and a lesser-known but simple and more robust formula that correctly handles the last day in February for leap years. You can use this formula to calculate things like:
- Contract renewal dates
- Project milestones
- Financial maturity dates
- Employee service anniversaries
- Insurance policy renewals
Introduction
In this example, the goal is to use a formula to add or subtract a given number of years (n) to a date. The dates are in column B, and the years are in column C. There are two main ways to go about this in Excel. The first method uses the YEAR, MONTH, and DAY functions to take apart the date into separate components: year, month, and day. Then, it adds n to the year and reassembles the components to a date. The second method uses the EDATE function to adjust the date by expressing years as months. Both methods are explained below. But first, let's look at why we can't just add 365 days to a date.
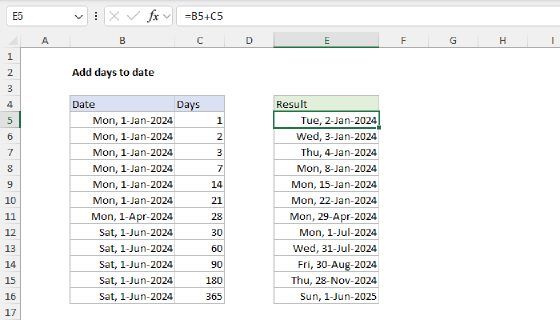
Why not just add 365?
Before diving into the formulas, it's important to understand how Excel stores and handles dates. Every date in Excel is stored as a number, where January 1, 1900, is day 1, January 2, 1900, is day 2, and so on. As I write this on November 21, 2024, the date number is 45617. Given this system, you might wonder if we can't just add 365 days to move forward a year:
=A1+365
Or, with n as years, move my a multiple of 365:
=A1+(n*365)
These formulas will correctly add 365 days (or multiples of 365 days) to a date. While this may seem logical, the problem is not all years have 365 days. Leap years have 366 days, so using 365 will be off by one day after every leap year. Worse, the error compounds over time. Dates far into the future could be off by days or even weeks. We need a more robust method.
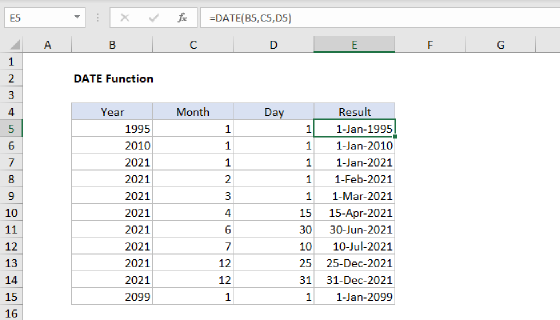
Method 1: DATE + YEAR, MONTH, and DAY
The traditional way to solve this problem is to use the DATE function together with the YEAR, MONTH, and DAY functions.
=DATE(YEAR(date)+n,MONTH(date),DAY(date))
In the worksheet shown, the formula in E5, copied down, looks like this:
=DATE(YEAR(B5)+C5,MONTH(B5),DAY(B5))
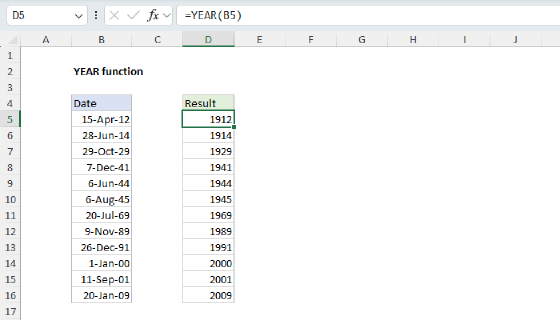
Working from the inside out, the YEAR, MONTH, and DAY functions are used to "take apart" the date into separate components like this:
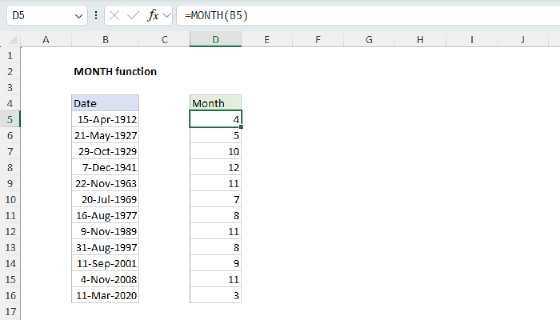
=YEAR(B5) // returns 1960
=MONTH(B5) // returns 3
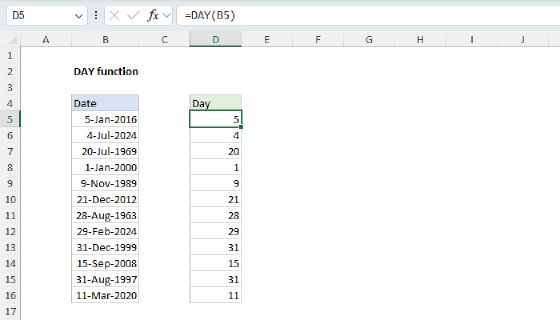
=DAY(B5) // returns 8
These individual values are then returned to the DATE function, which reassembles the date, adding n to the year value along the way. With the number 10 in cell C5, the formula evaluates like this:
=DATE(YEAR(B5)+C5,MONTH(B5),DAY(B5))
=DATE(1960+10,3,8)
=DATE(1970,3,8)
The formula returns the date March 8, 1970, in this example. When you modify either the initial date in B5 or the year offset in C5, the result automatically updates. This example shows off date manipulation in Excel, demonstrating how to:
- Break down a date using YEAR, MONTH, and DAY functions
- Reconstruct it using the DATE function
However, the formula is relatively complex, and there is one small problem: If the starting date falls on February 29 (a leap year) and the calculated end year is not a leap year, the result shifts to March 1. See the result in cell E12 for an example.
There is a simpler way to add years to a date, and it doesn't have trouble with leap years. It's based on the EDATE function.
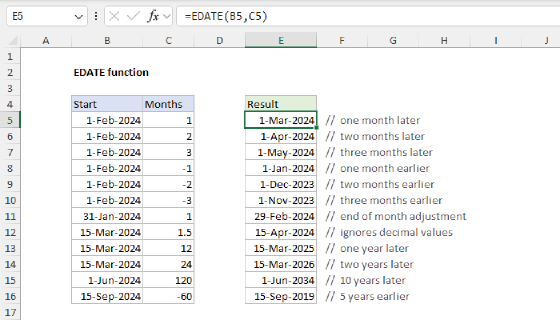
Method 2: EDATE function
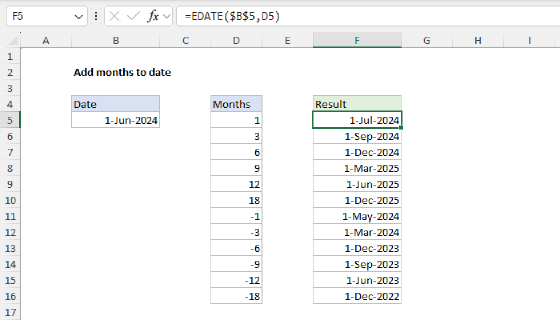
A much simpler way to solve this problem is to use the EDATE function. EDATE is designed to move a date by a given number of months. For example, to move a date in cell A1 forward by 6 months, you can use EDATE like this:
=EDATE(A1,6) // move forward 6 months
We can adapt the formula above to add whole years by multiplying by 12 in a generic formula like this:
=EDATE(A1,n*12)
In this formula, n represents the number of years to add. To use this approach in the workbook shown, we can enter the following formula in cell E5:
=EDATE(B5,C5*12)
You can see this formula applied in the worksheet below. Notice the results are the same, except for the result in E12:
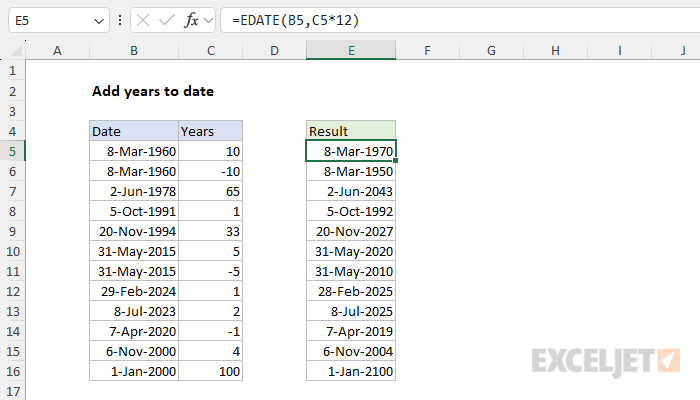
EDATE handles month-end dates intelligently. The date in cell B12 is February 29, 2024. When adding one year, EDATE recognizes that February 29, 2024 is the last day of a leap year month. Since 2025 is not a leap year, EDATE automatically adjusts the result to February 28, 2025 – preserving the "end-of-month" logic.
Summary
We looked at two methods to add years to a date with a formula: (1) the DATE function combined with YEAR, MONTH, and DAY functions, and (2) the EDATE function. The first method splits the date into parts, adjusts the year, and then reassembles the date. The second method, using the EDATE function, shifts the date by a specified number of months. Both methods work well. Both can handle dates far into the future, as well as negative year adjustments. However, I recommend the EDATE approach because it has some nice advantages:
- Much simpler formula with less room for error
- No leap year problem
- Easier to maintain and modify
Download the example workbook to try the formulas out yourself.