Summary
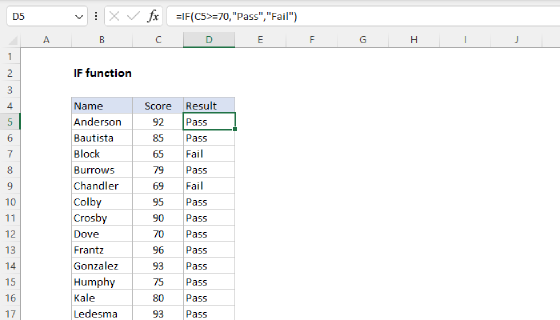
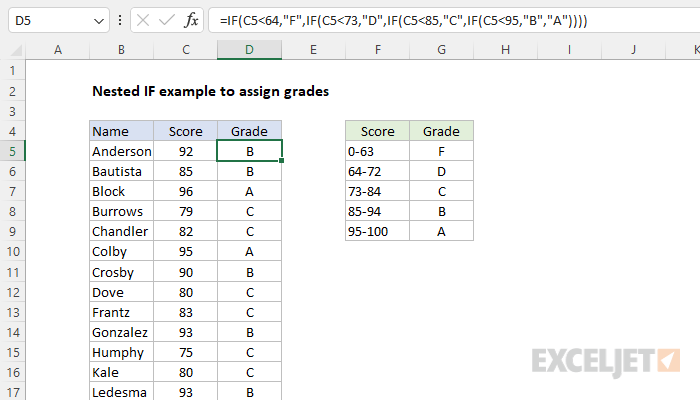
The IF function can be nested inside of itself to handle multiple conditions. In the example shown, a nested IF formula is used to assign a grade to a score. The formula in D5 contains 4 separate IF functions:
=IF(C5<64,"F",IF(C5<73,"D",IF(C5<85,"C",IF(C5<95,"B","A"))))
As the formula is copied down, it returns the correct grade for each score in column C.
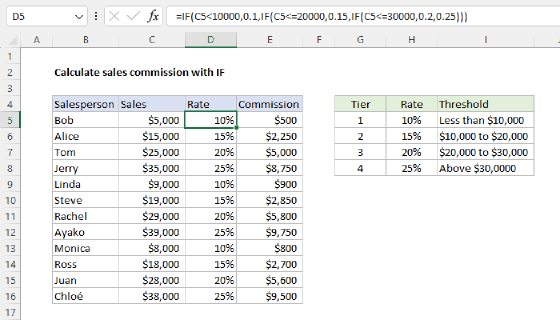
For another good example of a nested if formula, see: Calculate sales commission with IF.
Generic formula
=IF(T1,R1,IF(T2,R2,IF(T3,R3,IF(T4,R4,R5))))
Explanation
The goal is to assign a grade to each score in column C according to the rules in the table in the range F4:G9. One way to do this in Excel is to use a series of nested IF functions. Generally, nested IFs formulas are used to test more than one condition and return a different result for each condition.
Testing more than one condition
If you need to test for more than one condition, then take one of several actions, depending on the result of the tests, one option is to nest multiple IF statements together in one formula. You'll often hear this referred to as "nested IFs". The idea of nesting comes from embedding or "nesting" one IF function inside another. In the workbook shown, we are nesting IF functions to assign grades based on a score. The rules for assigning each grade can be seen in the table below:
| Score | Grade |
|---|---|
| 0-63 | F |
| 64-72 | D |
| 73-84 | C |
| 85-94 | B |
| 95-100 | A |
To create a nested IF formula that reflects this logic, start we can start either at the bottom of the scale, or the top. In this example, we start at the bottom. The first condition to test is if the score is below 64:
=IF(C5<64,"F"
If the result is TRUE, we return "F". If the result is FALSE, we move into the next IF function. This time, we test to see if the score is less than 73:
=IF(C5<64,"F",IF(C5<73,"D"
If TRUE, we return "D". We don't need to worry about scores less than 64 anymore, because that case is already handled. If the result is FALSE, we move to the next condition, which checks if the score is less than 85:
=IF(C5<64,"F",IF(C5<73,"D",IF(C5<85,"C"
If TRUE, we return "C". If FALSE, we move to the next condition, which checks if the score is less than 95:
=IF(C5<64,"F",IF(C5<73,"D",IF(C5<85,"C",IF(C5<95,"B"
If TRUE, we return "B". At this point, the only condition to check is if the score is between 95 and 100. However, by process of elimination, we know that if the score has not yet passed any tests, it must be between 95 and 100. So, we only need to provide "A" in the last IF for the value_if_false argument, and close up the formula with 4 parentheses, one for each IF function. The final formula in D5 is:
=IF(C5<64,"F",IF(C5<73,"D",IF(C5<85,"C",IF(C5<95,"B","A"))))
You can see that it's important in this case to move in one direction, either low to high, or high to low. This allows us to return a result whenever a test returns TRUE, because we know that any previous tests already returned FALSE.
Making nested IFs easier to read
By their nature, nested IF formulas can be hard to read. To make a nested IF easier to understand, you can add line breaks inside the formula to "line up" the tests and results line this:
=
IF(C5<64,"F",
IF(C5<73,"D",
IF(C5<85,"C",
IF(C5<95,"B",
"A"))))
The line breaks do not affect the formula. The Excel formula engine will ignore them.
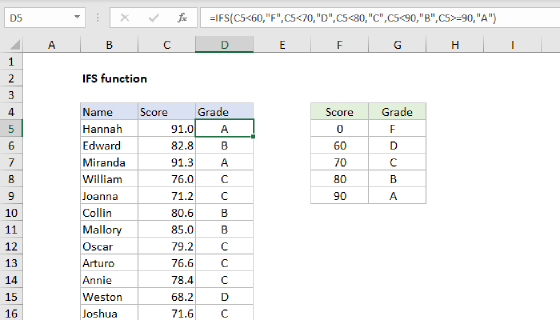
IFS function
Another way to solve this problem is with the IFS function, which can handle multiple conditions without nesting. The equivalent formula with IFs is:
=IFS(C5<64,"F",C5<73,"D",C5<85,"C",C5<95,"B",C5>95,"A")
The IFS function doesn't have a "default" value to return after all tests have run, so we need to use another logical test for the last category of scores, scores above 95. One workaround is to use TRUE as the last test, which you can see in the formula below.
=IFS(C5<64,"F",C5<73,"D",C5<85,"C",C5<95,"B",TRUE,"A")
Read more: How to use the IFS function.
Notes
- VLOOKUP can sometimes be used to replace complicated nested ifs.
- This article has many more examples of nested ifs with alternatives.